How to Grow Hydroponic Peppers: Complete Guide for Beginners
How to Grow Hydroponic Peppers: Complete Guide for Beginners
Key Takeaways
- ⏱️ Harvest Time: 80–120 days from transplant (12–18 weeks depending on variety).
- 🧪 Ideal pH: 5.8–6.2 — use our pH Calculator to stay on target.
- ⚡ Ideal EC: 2.0–3.0 mS/cm — rises during fruiting stage.
- 💧 Best System: Drip System or Deep Water Culture (DWC).
- 💡 Pro Tip: Peppers are self-pollinating but need a gentle shake or a small fan to move pollen between flower parts when growing indoors.
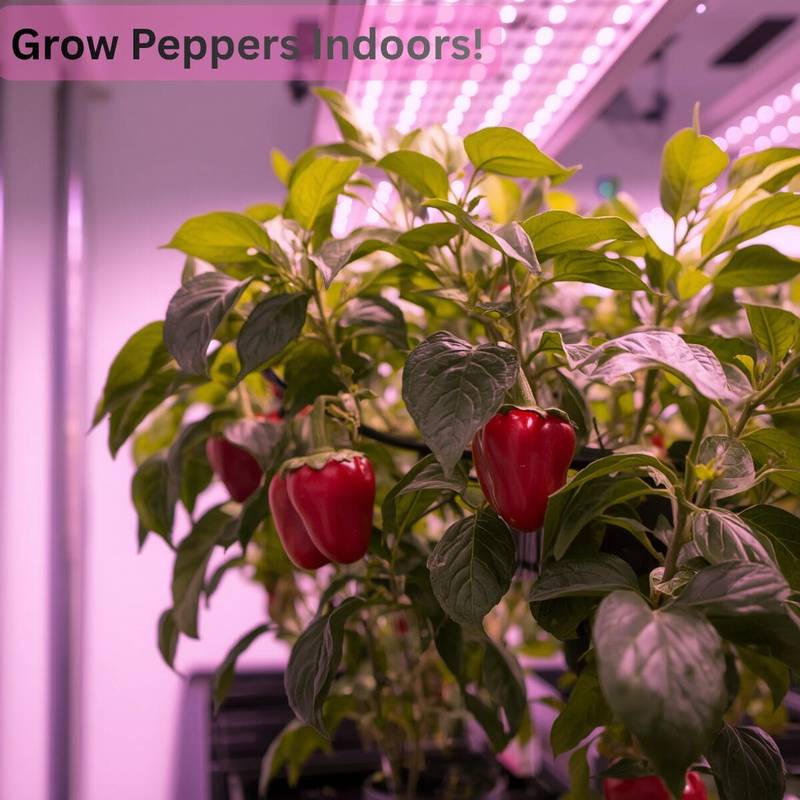
Learning how to grow hydroponic peppers is a game-changer for any indoor gardener. A peppers hydroponic setup lets you grow peppers hydroponically naturally — using organic nutrients and beneficial microbes — giving you full control over flavor, heat, and yield, without the guesswork of soil.

Insights Most Growers Overlook
- Nutrient Solution Temperature: Maintaining the ideal water temperature (65-72°F or 18-22°C) is paramount. Fluctuations outside this range can stress roots, impede nutrient uptake, and encourage pathogenic growth, significantly impacting plant health and yield.
- Aggressive Pruning for Production: Don’t be shy about pruning. Removing lower leaves that aren’t receiving adequate light and selectively topping the plant encourages bushier growth and redirects energy into fewer, larger, and earlier fruits, dramatically boosting overall yield.
- Manual Pollination is Key Indoors: Unlike outdoor growing, indoor hydroponic peppers lack natural pollinators. Gently shaking the plants or using a small brush to transfer pollen between flowers daily is important for successful fruit set.
- Cal-Mag Supplementation is Often important: Peppers are heavy feeders, especially for calcium and magnesium during the fruiting phase. Proactively supplementing with a Cal-Mag solution can prevent common issues like blossom end rot and improve fruit quality, even if your base nutrients claim to be ‘complete’.
- Root Zone Oxygenation is Non-Negotiable: While ensuring roots are in nutrient solution, many overlook the critical need for sufficient dissolved oxygen. Stagnant water or insufficient air stone performance can lead to root rot, nutrient lockout, and stunted growth, even with perfect nutrient levels.
Hydroponic peppers for beginners differ from leafy greens because they have two distinct life stages: vegetative and reproductive (fruiting). Unlike lettuce, peppers need a significant shift in nutrients and light intensity to move from growing leaves to producing heavy fruit. This makes them more challenging than herbs — but the reward is a perennial harvest that can last for years with correct pruning.
In this guide you will learn the exact parameters for each growth stage, how to prevent the most common problems like blossom end rot, and how to get your plants from seedling to full-fruiting bush efficiently.

Quick Reference: Hydroponic Pepper Parameters
Nutrient Solution pH
Maintaining the nutrient solution pH within a precise range is fundamental for optimal nutrient bioavailability and uptake in hydroponic pepper cultivation. A target pH range of 5.8 to 6.2 is recommended, ensuring macro- and micronutrients remain soluble and accessible to the plant’s root system. Deviations outside this narrow window can induce specific deficiencies.
- Below 5.8: Iron, manganese, and aluminum toxicity can occur, while calcium and magnesium lockout becomes a significant concern, often manifesting as blossom end rot in developing fruits due to impaired calcium transport.
- Above 6.2: Micronutrient deficiencies, particularly iron, manganese, and zinc, are common as these elements precipitate out of solution. Phosphorus uptake can also be inhibited.
- Adjustment: Monitor pH daily using a calibrated pH meter. Adjustments should be made gradually using hydroponic-grade pH Up (typically potassium hydroxide) or pH Down (nitric acid or phosphoric acid), adding small increments and retesting.
Electrical Conductivity (EC) / Total Dissolved Solids (TDS)
The Electrical Conductivity (EC), measured in mS/cm, directly correlates to the concentration of dissolved mineral salts in the nutrient solution, reflecting the total nutrient availability. Peppers have varying nutritional requirements throughout their lifecycle, necessitating a phased EC strategy.
- Seedling/Young Vegetative Stage (1-3 true leaves): Initiate with a lower EC of 1.0 – 1.4 mS/cm to prevent nutrient burn on tender root systems.
- Mature Vegetative Stage: Gradually increase the EC to 1.8 – 2.2 mS/cm as the plant develops robust foliage and prepares for flowering.
- Flowering and Fruiting Stage: Elevate the EC to 2.5 – 3.0 mS/cm. This higher concentration supports the energy demands of fruit production, with increased uptake of potassium and phosphorus being particularly beneficial for yield and fruit quality.
- Monitoring: Use a calibrated EC meter daily. Replenish the reservoir with a half-strength nutrient solution or plain pH-adjusted water based on consumption and EC readings to maintain stability and prevent salt buildup.
Root Zone and Air Temperature
Temperature management impacts metabolic rates, dissolved oxygen levels, and susceptibility to pathogens. Balancing both air and root zone temperatures is key for vigorous pepper growth and fruit development.
- Air Temperature: Maintain daytime air temperatures between 21-27°C (70-80°F) for optimal photosynthesis and growth. Nighttime temperatures should drop to approximately 18°C (65°F) to allow for respiration and conserve sugars for fruit development.
- Root Zone Temperature (RZT): The nutrient solution temperature should consistently range from 18-22°C (65-72°F). Temperatures below 18°C significantly slow nutrient uptake and plant metabolism, potentially leading to complete growth cessation. Temperatures above 22°C reduce dissolved oxygen concentrations, creating anaerobic conditions favorable for root rot pathogens such as Pythium and Phytophthora, impairing nutrient and water absorption. Use nutrient chillers or heaters as needed to stabilize RZT.
Photoperiod and Light Intensity
Peppers are day-neutral plants for flowering, but an extended photoperiod significantly boosts vegetative growth and overall yield. Optimal light intensity, measured as Photosynthetic Photon Flux Density (PPFD), varies by growth stage.
- Photoperiod: Provide a consistent light cycle of 14-18 hours per day, followed by a dark period of 6-10 hours. The dark period is necessary for respiration, translocation of photosynthates, and other regulatory processes.
- Light Intensity (PPFD): Target a PPFD of 250-400 µmol/m²/s during the vegetative phase. Increase to 400-600 µmol/m²/s during flowering and fruiting to drive robust fruit set and development. Ensure uniform light distribution across the canopy.
Hydroponic System Selection and Stability
The choice of hydroponic system plays a direct role in maintaining environmental stability and supporting the plant’s physical structure as it matures and fruits. Drip Systems and Deep Water Culture (DWC) are highly effective for hydroponic pepper cultivation.
- Drip Systems: Offer precise control over nutrient delivery and can easily support larger, top-heavy plants with appropriate substrate (e.g., rockwool, coco coir) providing physical anchorage.
- Deep Water Culture (DWC): Provides consistent access to aerated nutrient solution, promoting vigorous root development. However, as pepper plants become laden with fruit, they require substantial external physical support structures (e.g., staking, trellising) to prevent toppling.
- Structural Integrity: Regardless of the system, peppers frequently become top-heavy during fruiting. Implement proactive measures like caging, staking with garden ties, or employing overhead trellising nets from early vegetative stages to prevent stem breakage and maintain plant stability.

Best Hydroponic System for Peppers
The selection of an appropriate hydroponic system for *Capsicum annuum* (pepper plants) necessitates a strong emphasis on physical stability and optimized root zone conditions. Pepper plants develop a substantial canopy and bear heavy fruit loads, rendering systems with inadequate structural support, such as conventional Nutrient Film Technique (NFT) setups, suboptimal. The plant’s architecture, particularly when laden with ripening fruit, requires robust anchorage to prevent toppling and root damage.
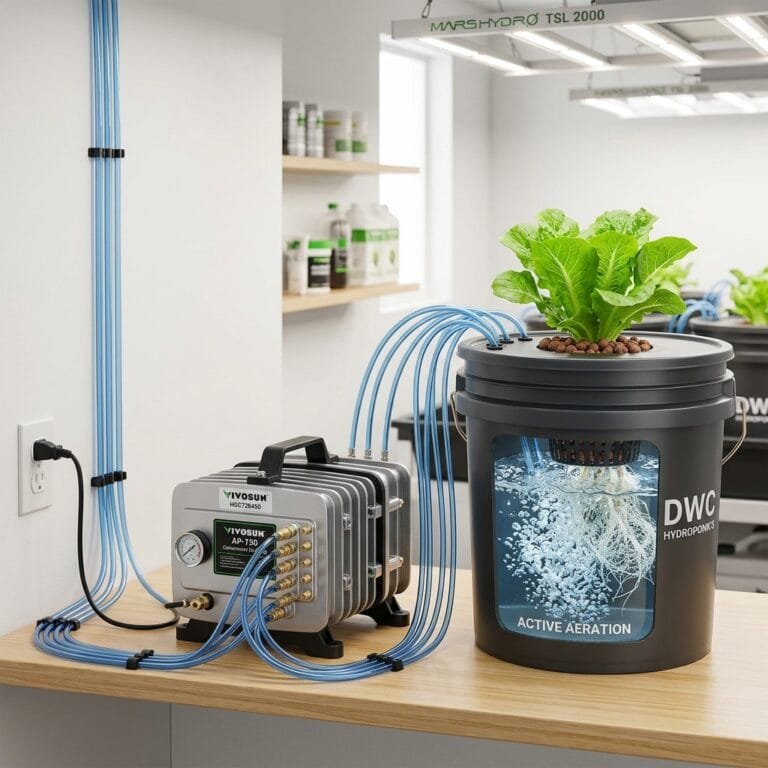
Deep Water Culture (DWC) for Peppers
For individuals initiating their hydroponic pepper cultivation, a single-plant Deep Water Culture (DWC) system, typically employing an opaque 5-gallon bucket, represents an effective starting point. This configuration offers ample root zone volume and exceptional stability for the plant’s developing stem. Optimal DWC performance for peppers involves:
- **Container Selection:** Utilize dark or opaque 5-gallon buckets to prevent light penetration into the reservoir, which inhibits algal growth.
- **Aeration:** Implement an appropriately sized air stone (e.g., 2-inch cylindrical or 4-inch disc) connected to a high-output air pump (e.g., 2.5-5 watts per plant) to maintain dissolved oxygen levels above 6.0 ppm.
- **Nutrient Parameters:**
- **pH:** Maintain a stable pH range between 5.8 and 6.2 throughout the entire growth cycle for optimal nutrient uptake. Monitor daily and adjust using pH Up/Down solutions.
- **Electrical Conductivity (EC):**
- **Vegetative Stage:** Target an EC of 1.4-1.8 mS/cm.
- **Fruiting/Flowering Stage:** Elevate EC to 2.0-2.5 mS/cm to support fruit development and yield.
- **Temperature Control:** Maintain reservoir water temperature between 68-72°F (20-22°C) to prevent root diseases and ensure oxygen solubility.
- **Solution Management:** Completely refresh the nutrient solution every 7-10 days to prevent nutrient imbalances and pathogen accumulation. Top off with pH-adjusted water (no nutrients) between changes as the plant consumes water.
Drip Systems for Enhanced Control
Recirculating or drain-to-waste drip systems offer precise control over nutrient delivery and are suitable for larger pepper operations. These systems typically utilize inert media like coco coir or rockwool cubes in individual containers, providing excellent physical support. For drip systems:
- **Growing Medium:** Coco coir (buffered) or rockwool slabs/cubes are preferred for their excellent aeration and water retention properties.
- **Irrigation Schedule:** Implement timed irrigation cycles, typically 2-4 short cycles per day during vegetative growth and 4-6 cycles during fruiting, ensuring a 10-20% runoff percentage in drain-to-waste systems.
- **Nutrient Parameters:**
- **pH:** Maintain pH within 5.8-6.2.
- **EC:**
- **Vegetative:** 1.6-2.0 mS/cm.
- **Fruiting:** 2.2-2.8 mS/cm, depending on cultivar vigor and environmental conditions.
Considerations for NFT and Kratky Methods
While often listed, NFT systems are generally not recommended for mature pepper plants due to their inability to provide adequate physical support for the heavy biomass and fruit weight. The shallow channels and limited root space also restrict the plant’s full productive capacity. Similarly, the static nutrient solution and limited oxygenation inherent to the Kratky method make it unsuitable for long-duration, high-yielding fruiting crops like peppers after the initial vegetative phase. Significant nutrient depletion and pH shifts become unmanageable without active replenishment and aeration.
Best Varieties of Peppers for Hydroponics
Optimal Pepper Varieties for Hydroponic Cultivation
While nearly any *Capsicum* species can be adapted to hydroponic environments, selecting cultivars exhibiting determinate growth habits or naturally compact architecture significantly streamlines management under controlled conditions. This minimizes the need for extensive pruning and allows for more efficient light penetration and nutrient distribution within recirculating or drain-to-waste systems. General nutrient solution parameters for peppers typically fall within a pH range of 5.8 to 6.5 and an Electrical Conductivity (EC) between 1.8 to 2.8 mS/cm, adjusted according to growth stage.
- California Wonder (Bell Pepper) — This classic bell pepper cultivar thrives under hydroponic conditions when precise environmental control is maintained. For optimal fruit development and to prevent calcium deficiency disorders like blossom end rot, the nutrient solution pH must be consistently held within 5.8-6.2. During the fruiting phase, an EC of 2.0-2.5 mS/cm, rich in calcium (150-200 ppm) and magnesium (50-70 ppm), promotes the development of thick-walled, heavy fruits. These plants benefit from a Photosynthetic Photon Flux Density (PPFD) of 600-800 µmol/m²/s during the generative phase for robust yields.
- Jalapeño — Recognized for its adaptability, the Jalapeño is an outstanding choice for novice hydroponic growers. Its resilience allows it to perform well even with minor fluctuations in nutrient parameters. Maintain a pH between 5.8-6.3 and an EC of 1.8-2.4 mS/cm. The plant’s compact, bushy growth habit means it fits well into various system types, including deep water culture (DWC) or nutrient film technique (NFT). Strategic pruning of lower leaves and suckers encourages air circulation and redirects energy towards fruit production, extending its prolific harvest season.
- Thai Hot / Bird’s Eye — Cultivars like Thai Hot or Bird’s Eye peppers are superb for maximizing yield in limited grow spaces due to their naturally compact and bushy morphology. These highly prolific plants prefer a slightly lower pH range of 5.5-6.0 to enhance nutrient uptake, supporting continuous fruit set. An EC of 1.6-2.2 mS/cm is typically adequate, adjusted slightly upward during peak fruiting to support capsaicin production. Their smaller fruit size and high density require sustained moderate light intensity (400-600 µmol/m²/s PPFD) and consistent nutrient delivery for optimal results.
- Habanero — For growers seeking significant heat, Habanero varieties are a rewarding, albeit more demanding, hydroponic selection. These plants have an extended vegetative phase and require higher light intensity, specifically a PPFD of 800-1000 µmol/m²/s, to achieve full maturity and maximum capsaicin development. Maintain a stable pH of 5.5-6.0. During the flowering and fruiting stages, elevate the nutrient solution EC to 2.2-2.8 mS/cm, focusing on higher phosphorus and potassium ratios to support fruit expansion and flavor profile. Precise temperature control (daytime 25-30°C, nighttime 18-22°C) is also beneficial for optimal fruit development.
Step-by-Step Setup Guide
Follow these eight steps to take your peppers from seed to harvest successfully.
- Sow the Seeds: Place pepper seeds in rockwool cubes. Keep them warm at 80°F using a heat mat. Track germination progress with our Seed Germination Timer.
- Wait for True Leaves: Once the seedling has two sets of true leaves, it is ready for its first light dose of nutrients.
- Set Up the reservoir: Fill your bucket or reservoir with water and add a “Bloom” or “tomato” base nutrient. Use the Nutrient Calculator for exact mixing ratios.
- Check Initial Levels: Adjust pH to 6.0 and set EC to 1.2 mS/cm for the seedling stage. Never start with high EC — it burns young roots.
- Transplant to System: Place the rockwool cube into a net pot filled with clay pebbles. Ensure pebbles support the main stem firmly and the cube sits just above the waterline.
- Vegetative Phase: Provide 16–18 hours of light. As the plant grows, use the Growth Rate Tracker to monitor height weekly.
- Top the Plant: When the main stem reaches 8 inches, cut the growing tip. This forces the plant into a bushy, stable shape with multiple fruiting branches instead of one tall unstable stem.
- Pollination: Once flowers appear, gently shake the plant daily or use a small paintbrush to transfer pollen within each flower. Peppers are self-pollinating but need movement to release pollen indoors.
Nutrient Requirements for Hydroponic Peppers
Optimizing nutrient delivery is paramount for successful hydroponic pepper cultivation. A common error among novice growers is maintaining a static nutrient profile throughout the plant’s life cycle. Peppers exhibit distinct physiological requirements at each developmental phase, necessitating precise adjustments to macronutrient and micronutrient concentrations to maximize yield and fruit quality while mitigating physiological disorders.
Vegetative Growth Phase (Weeks 1–6)
During the initial vegetative stage, typically spanning weeks 1 through 6 post-germination, the primary objective is to foster robust root development and a strong foliar canopy. Nitrogen (N) is the predominant macronutrient required for chlorophyll production and protein synthesis. A balanced N-P-K ratio favoring nitrogen, such as 5-2-4, or specific elemental concentrations around 120-150 ppm N, 30-40 ppm P, and 70-90 ppm K, supports vigorous stem elongation and leaf expansion. Maintain the electrical conductivity (EC) of the nutrient solution within the precise range of 1.8–2.2 mS/cm. This specific EC range ensures sufficient nutrient availability without inducing osmotic stress on nascent root systems. The pH level of the solution should be meticulously maintained between 5.8 and 6.2. This slightly acidic range optimizes the bioavailability of macro and micronutrients, particularly iron and manganese, which are necessary for lush green growth.
- **Nitrogen Dominance:** Target N-P-K ratios such as 5-2-4, or elemental concentrations of 120-150 ppm N.
- **Target EC:** 1.8–2.2 mS/cm.
- **Optimal pH:** 5.8–6.2, to enhance micronutrient uptake.
- **Actionable Goal:** Develop a robust structural foundation capable of supporting heavy fruit loads.
Reproductive Phase (Week 7 Onwards)
As the pepper plants transition from vegetative growth to the reproductive phase, typically commencing around week 7 with the emergence of the first flower buds, their nutrient demands undergo a significant shift. The plant’s energy allocation moves from foliar development to flower initiation and fruit set. Consequently, a nutrient solution rich in Phosphorus (P) and Potassium (K) becomes imperative. A suitable N-P-K ratio for this phase would be approximately 5-10-15, or elemental concentrations around 80-100 ppm N, 60-80 ppm P, and 150-200 ppm K. Phosphorus supports energy transfer and flower development, while Potassium is critical for fruit sizing, sugar transport, and overall fruit quality, including capsaicin production in hot varieties. Utilize our hydroponic nutrient calculator to accurately formulate these custom blends.
The EC must be elevated to 2.5–3.0 mS/cm to meet the increased demands of fruit production. Continuous monitoring of Calcium (Ca) and Magnesium (Mg) levels is paramount. Target concentrations of 150-200 ppm Ca and 40-60 ppm Mg are generally effective. Maintaining a pH level between 6.0 and 6.5 during this stage is highly recommended. This slightly higher pH ensures optimal Calcium availability, directly preventing physiological disorders such as blossom end rot, characterized by soft, darkened necrotic tissue at the distal end of the fruit, even when Ca is present in the solution. Regularly replenish the reservoir and adjust EC/pH daily to prevent nutrient lockout or concentration drift. If pH drops below 5.5, Calcium uptake is severely inhibited, leading to blossom end rot despite adequate Calcium levels in the solution.
- **P and K Dominance:** Target N-P-K ratios like 5-10-15, or elemental concentrations of 150-200 ppm K.
- **Target EC:** 2.5–3.0 mS/cm.
- **Optimal pH:** 6.0–6.5, specifically for peak Calcium uptake.
- **Calcium & Magnesium:** Aim for 150-200 ppm Ca and 40-60 ppm Mg to prevent blossom end rot.
- **Actionable Tip:** Monitor pH daily. Immediate adjustment is required if it falls below 5.8 to maintain Ca bioavailability.
Common Problems and How to Fix Them
Advanced Hydroponic Problem Diagnostics and Remediation
Successful hydroponic cultivation demands precise environmental control and swift issue resolution. Understanding the underlying physiological mechanisms behind common plant issues permits targeted intervention, safeguarding yields and plant health. This guide offers technical diagnoses and actionable corrective strategies for frequently encountered problems.
Blossom End Rot
This physiological disorder, particularly prevalent in fruiting crops like tomatoes and peppers, manifests as a sunken, necrotic lesion at the fruit’s distal end. Its primary cause is localized calcium deficiency within developing fruit tissue, often exacerbated by fluctuating moisture levels or rapid vegetative growth that outpaces calcium transport. Calcium mobility within the plant is primarily via the xylem; any factor impairing transpiration or root uptake can precipitate this issue. Low solution pH, specifically below 5.8, significantly reduces calcium availability and uptake.
- **Diagnostic Indicators:** Distinctive dark, leathery rot at the fruit’s bottom, while upper foliage appears healthy.
- **Technical Fix:** Adjust nutrient solution pH to a stable range of 6.0-6.5 for fruiting plants to optimize calcium uptake. Implement a calcium and magnesium supplement, commonly referred to as Cal-Mag, at a concentration typically yielding 100-150 ppm elemental calcium (e.g., 5-10 mL per gallon, depending on product concentration). Ensure consistent root zone moisture and avoid extreme wet-dry cycles in substrate-based systems. Maintain a stable root zone temperature between 18-22°C (65-72°F) for efficient nutrient absorption.
Flowers Falling Off (Abscission)
The premature shedding of flowers, or abscission, indicates environmental stress affecting pollination or fertilization. High ambient temperatures degrade pollen viability, while low temperatures can hinder pollen tube growth. Inadequate air movement or excessively high relative humidity (RH > 70%) can prevent pollen release or dispersal, especially in self-pollinating species.
- **Diagnostic Indicators:** Healthy-looking flowers detach from the plant stem without forming fruit.
- **Technical Fix:** Maintain ambient grow room temperatures between 21-24°C (70-75°F) during the flowering cycle. Reduce daytime relative humidity to 40-60% to facilitate pollen desiccation and release. Employ a small oscillating fan to generate gentle air movement around the canopy for improved natural pollination. For manual pollination, gently vibrate the plant stems daily during peak daylight hours or use an electric toothbrush to stimulate pollen release.
Curling Leaves
Leaf curling presents in various forms, each indicative of a specific stressor. Upward curling (“tacoing”) often signals excessive light intensity, leading to photo-oxidative stress and heat accumulation within the leaf tissue. Downward curling or clawing can indicate nutrient solution imbalances (e.g., nitrogen toxicity) or specific pest infestations. Stunted, distorted, and generally curled new growth points strongly to sap-sucking pests like aphids or thrips.
- **Diagnostic Indicators:** Upward leaf curling, sometimes with yellowing or crispy edges, suggests light burn. Downward clawing can indicate nutrient excess. Distorted, sticky, or stunted new leaves with visible tiny insects on undersides confirms pest presence.
- **Technical Fix:** For light stress, quantify light output using a PAR meter; if Photosynthetic Photon Flux Density (PPFD) exceeds 800-1000 µmol/m²/s at the canopy during generative stages (or >600 for vegetative), raise grow lights by 15-30 cm (6-12 inches) or reduce dimmable fixture intensity. For pest issues, conduct a thorough inspection of leaf undersides and new growth. Apply an insecticidal soap or neem oil solution (e.g., 5 mL neem oil concentrate per liter of water) targeting affected areas, or introduce appropriate biological controls.
Slow Fruit Ripening
The rate of fruit maturation is directly coupled with the plant’s capacity for photosynthesis and carbohydrate allocation. Insufficient light intensity or a suboptimal photoperiod restricts sugar production, thereby delaying ripening. Energy directed towards vegetative growth rather than fruit development can also contribute.
- **Diagnostic Indicators:** Fruits remain green or fail to fully color for extended periods beyond their expected ripening window.
- **Technical Fix:** Ensure the daily light integral (DLI) for fruiting crops is between 30-45 mol/m²/day, ideally pushing towards 50-60 mol/m²/day for high-demand plants, delivered via a photoperiod of 16-18 hours. Verify PPFD at the canopy using a PAR meter; target 700-1000 µmol/m²/s for optimal ripening. Ensure a balanced nutrient solution with sufficient potassium (K) during the ripening phase, as K plays a direct role in sugar transport.
White Bumps on Leaves (Edema)
Edema is a non-pathogenic physiological disorder resulting from excessive water absorption by roots coupled with insufficient transpiration from leaves. This imbalance causes leaf cells to swell and rupture, forming characteristic white, crystalline, or blister-like bumps, typically on the undersides of leaves. It often occurs under conditions of high humidity, low air movement, or warm root zones with cooler air temperatures.
- **Diagnostic Indicators:** Small, raised, often whitish or tan bumps, typically on the lower surface of leaves, resembling insect eggs but are firm and do not move.
- **Technical Fix:** Improve air circulation throughout the grow area using oscillating fans to promote boundary layer disturbance and increase transpiration rates. Target a relative humidity of 40-60%. Ensure adequate ventilation to exchange stale, moisture-laden air with drier, fresh air. Maintain an optimal root zone temperature of 18-22°C (65-72°F) to prevent excessive water uptake.
Tiny or Malformed Fruit
Underdeveloped or misshapen fruit signifies a lack of resources during critical development phases, or inadequate pollination. A common nutrient-related cause is insufficient electrical conductivity (EC) of the nutrient solution during the fruiting stage, starving the developing fruit of important macro and micronutrients. Poor pollination can result in uneven or partial fertilization, leading to misshapen fruit.
- **Diagnostic Indicators:** Fruits fail to swell to typical size or exhibit asymmetrical, distorted shapes; often accompanied by general reduced vigor.
- **Technical Fix:** Increase the nutrient solution EC to an appropriate range for fruiting plants, typically 2.0-3.0 mS/cm (or 1000-1500 PPM on a 0.5 conversion scale) for heavy feeders like tomatoes. Monitor and adjust EC daily, ensuring the plant is consuming nutrients effectively. Maintain solution pH between 5.8-6.5 to ensure optimal nutrient availability. Re-evaluate pollination strategies as described for “Flowers Falling Off.”
Purple Leaf Discoloration
Purple coloration in leaves, particularly on undersides or petioles, is most frequently a symptom of phosphorus deficiency. Phosphorus is important for energy transfer within the plant. Cold root zone temperatures (below 18°C/65°F) can mimic a P deficiency by inhibiting its uptake, even if P is present in the solution. Intense LED lighting can also induce anthocyanin production (purple pigmentation) as a photo-protective response, especially in genetically predisposed cultivars or when light acclimation is insufficient.
- **Diagnostic Indicators:** Older leaves, petioles, and stems develop a purplish hue, often accompanied by stunted growth. If localized to upper leaves directly under intense light, it suggests photo-stress.
- **Technical Fix:** First, verify nutrient solution temperature is within the optimal 18-22°C (65-72°F) range. Check and stabilize pH to 5.8-6.5, as P uptake is pH-sensitive. If P deficiency is confirmed, switch to a nutrient formulation with a higher phosphorus ratio or introduce a bloom booster. For suspected LED stress, measure PPFD at the canopy; if excessively high (e.g., >1000 µmol/m²/s), increase fixture distance by 15-30 cm (6-12 inches) or reduce light intensity to prevent photoinhibition.
Harvesting Peppers from a Hydroponic System
Optimizing Hydroponic Pepper Harvest
Precise harvest timing significantly influences both the organoleptic profile and nutritional density of hydroponically grown peppers. Green peppers represent the physiologically immature stage, possessing a crisp texture and a typically less complex flavor profile. As the fruit transitions through color stages (e.g., green to red for bell peppers, or green to orange/yellow for specific varieties like ‘Habanada’), sugar content, particularly fructose and glucose, escalates. This biochemical maturation directly correlates with increased levels of carotenoids (responsible for red, orange, yellow pigments) and ascorbate (Vitamin C), with fully ripened red bell peppers exhibiting up to a threefold increase in Vitamin C compared to their green counterparts. For piquant varieties, capsaicinoid biosynthesis intensifies as the fruit matures, concentrating the heat. Monitor plant health; a stable nutrient solution with an Electrical Conductivity (EC) range of 2.0-2.8 mS/cm and a pH maintained between 5.8-6.2 during the fruiting phase supports optimal fruit development and ripening.
Precision Harvesting Techniques
Employing correct harvesting methods prevents plant stress and maximizes subsequent yields. Use sterilized, sharp bypass pruners or scissors. Locate the pedicel (fruit stem) connecting the pepper to the main branch. Make a clean cut approximately 1 cm above the calyx (the leafy structure at the top of the fruit). This method safeguards the primary fruiting branches from mechanical damage, which could otherwise compromise vascular tissue and lead to systemic shock or disease entry points. Never forcibly pull peppers, as their pedicels are rigid and pulling can detach entire fruiting spurs, severely reducing future production cycles. Sterilize cutting tools with isopropyl alcohol between plants to mitigate pathogen transmission.
Yield Projections and Environmental Control
Hydroponic systems, when optimized, often surpass soil-based yields due to precise environmental control. A healthy ‘Early Jalapeño’ plant can produce 30-50 fruits over its productive lifespan, while a ‘California Wonder’ bell pepper plant typically yields 6-10 large, mature fruits, depending on cultivar genetics and cultivation intensity. Factors directly impacting yield include daily light integral (DLI), maintained at 18-25 mol/m²/day during fruiting, and consistent nutrient delivery. For maximum productivity, maintain ambient temperatures between 20-28°C and root zone temperatures around 20-24°C. Proper pruning, focusing on removing non-fruiting suckers and senescent leaves, redirects energy towards fruit development. Monitoring Vapor Pressure Deficit (VPD) is paramount; maintain a VPD of 0.8-1.2 kPa during flowering and fruiting to optimize stomatal function, nutrient uptake (particularly calcium), and mitigate blossom end rot risk. This precision fosters consistent fruit set and maturation rates.
Post-Harvest Handling and Storage Protocols
Hydroponically cultivated peppers typically exhibit higher turgidity due to consistent, optimized water uptake. This necessitates specific post-harvest handling to maintain quality. For short-term preservation, store whole peppers unwashed in a perforated plastic bag or a paper bag within the crisper drawer of a refrigerator, maintaining temperatures near 7-10°C and relative humidity (RH) of 90-95%. This minimizes moisture loss and respiration rates, extending freshness for up to two weeks. Avoid storing peppers below 7°C for extended periods, as chilling injury can manifest as pitting or discoloration. For long-term preservation, deseed and slice peppers, then blanch them briefly before flash-freezing on a tray and transferring to airtight freezer bags. This method preserves quality for up to six months. For alternative preservation, consider dehydration or pickling processes.
Advanced Tips & Daily Maintenance
- Daily Check: Verify your reservoir water level and temperature are stable.
- Weekly Maintenance: Calibrate your pH pen and verify your EC readings are accurate.
- System Flush: Remember to completely flush and replace your nutrient solution every 10-14 days to prevent salt buildup.
Troubleshooting Common Issues
- Yellowing Leaves: This often indicates a nutrient deficiency (e.g., nitrogen or iron) or pH imbalance. Check your nutrient solution’s pH (aim for 5.5-6.5) and EC/TDS levels. Replenish or adjust your solution if needed.
- Slow or Stunted Growth: Ensure your grow lights are at the correct distance and intensity, and that your nutrient solution is adequately oxygenated. Poor root health from high water temperatures or disease can also be a cause.
- Flower Drop or No Fruit Set: Lack of pollination is a common issue for indoor peppers. Gently shake plants daily or use a small brush to transfer pollen between flowers. Temperature extremes (too hot or too cold) can also cause flower abortion.
- Pest Infestations (e.g., Aphids, Spider Mites): Inspect plants regularly. For small infestations, a strong stream of water or insecticidal soap can be effective. Introduce beneficial insects if the problem persists, or consider organic pest control methods.
Insights Most Growers Overlook
- The “Topping” Technique: Pinching off the top of your pepper plant when it reaches 8 inches tall will force it to branch out into a wider, bushier plant. This dramatically increases the number of fruiting nodes and your overall yield.
- Magnesium Hogs: Hot peppers (like Jalapeos and Habaneros) consume massive amounts of Magnesium. If the leaves turn yellow between the veins while the veins stay green, you immediately need to add a Cal-Mag supplement.
- Flower Drop: If temperatures exceed 85F or drop below 65F at night, peppers will abort and drop their flowers before setting fruit. Climate control is critical.
Frequently Asked Questions
Frequently Asked Questions About Hydroponic Peppers
Why are my hydroponic peppers flowering but not producing fruit?
This is usually due to a lack of pollination or extreme temperatures. Peppers are self-pollinating, but indoors they lack wind. You must gently shake the plants daily. Additionally, if temperatures exceed 85F, the pollen becomes sterile.
Are hot peppers easier to grow hydroponically than bell peppers?
Yes. Hot peppers (like chillies and jalapeos) generally have a faster maturation rate, require less physical support, and are more forgiving with EC swings than large, heavy bell peppers which are highly susceptible to blossom end rot.